
The deadline to upload both your E-poster and video pitch has been extended to April 16, 23:59 CEST.
Instructions on how to upload your poster in the abstract system
Before you upload the video of your presentation, you are expected to upload the poster itself, in the abstract system. If you have not done so already. Please follow these steps:
Instructions for E-Poster Creation:
In order to create your E-Poster please use our template, which you can download by clicking this link.
- All E-Posters should be prepared in English
- Layout: 1-page PDF file in portrait (vertical orientation)
- Poster Size:
- Pixels: Recommended size (format W x H) is 2160 x 3840 px
- In cm: 72 width and 128 height (this can be used to setup PowerPoint)
- Format: 9:16
- DPI 300 pixels/inch
- File Size: Recommended file size is 3MB or less.
- File Format: PDF (.pdf)
- Media: Images/photos, graphs and tables can be included in the E-Poster.
- Multimedia: Videos can NOT be included in the E-Poster.
You can also access the template, along with detailed instructions for preparing and submitting your E-Poster once you log into the submission platform.
Uploading Your E-Poster:
Visit the Abstract system and to log in, use the e-mail address you entered when you submitted your abstract.
The final deadline for uploading your E-poster has been extended to April 16th.
- There’s a “Forgot password?” function in case you have forgotten your credentials.
- Note that it is the original submitter of the abstract (not the presenter) that needs to upload the poster.
- Once logged in, navigate to “Upload poster”, select your PDF, and confirm the upload.
You will give a short oral presentation alongside your poster, which will be displayed on a digital screen. Please prepare a 5-minute presentation. At the end of the session, there will be a designated time for discussions and questions.
Video
- Video format: MP4
- Resolution: 720p with 4000 kbps
- Image format: Landscape format (16: 9)
Video length:
Max – 5 minutes
To maximise engagement, we kindly ask you to upload a video pitch (max. 5 minutes) summarising your key findings. This video will serve as a preview to encourage attendees to visit your poster session.
The video pitch will not be played during the session but will be available on the Congress web app for participants to view in advance.
You will receive an email invitation this week (March 3-7) providing access to the platform for uploading your video pitch.
To get a sneak peak tutorial on how to upload your video, follow this link.
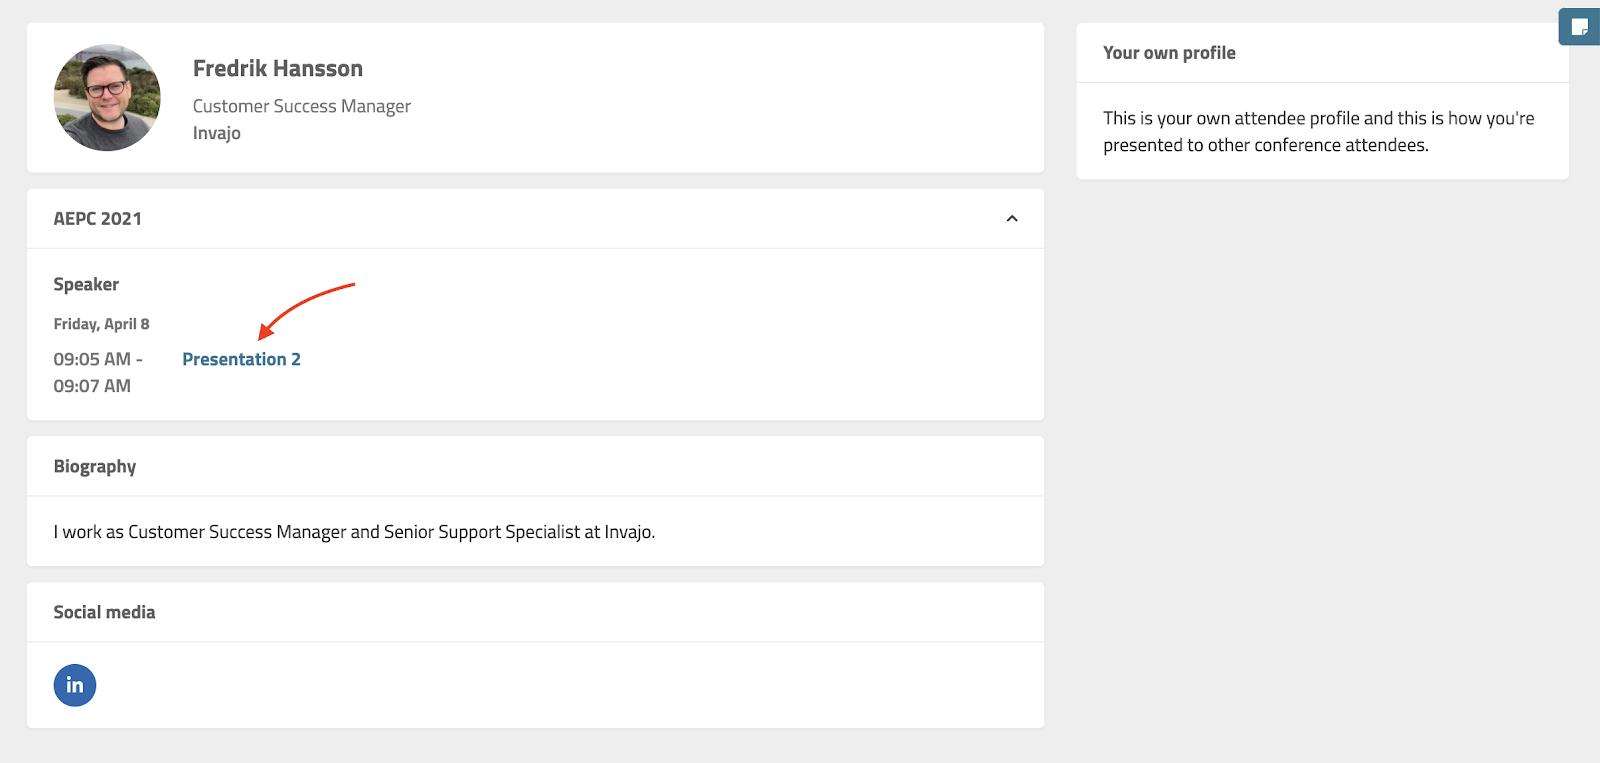
- Locate your name on the upper right corner and click on it, continue by clicking on the menu item “My profile”.
- You have now reached your Profile where you will see all presentations or events that you have an active role in.
- When you click on the name of an event you will be brought to the “session page” in which your presentation is scheduled.
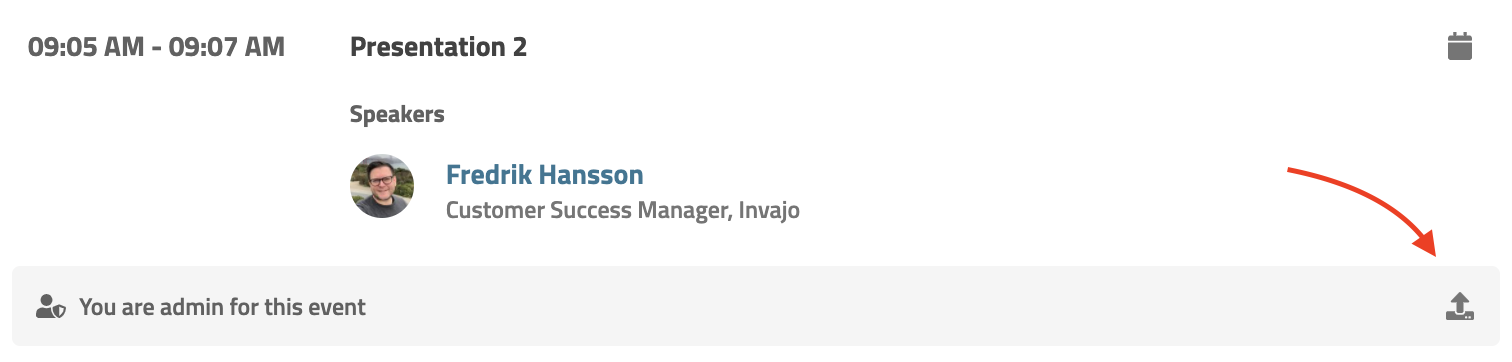
- Below your presentation you will see an infobox with a link to upload a video.
- Click on the icon and select the video you wish to upload.
Please note that the video needs to be in MP4-format and not bigger than 500mb. The video will be compressed and uploaded to a third-party service (Vimeo) that will host the video. The video will be private and not publicly available. The video will not be available in the event list until this process is complete. When this has happened, you will be notified by email.
- The menu bar will close automatically once the upload is finished and you will see a success message in the lower left corner.
Depending on the file size and your internet connection this may take several minutes.
- You will receive an email once the video has been processed and uploaded to the virtual platform.
- You will now be able to see the video from your presentation.
Please note, as a poster presenter, you are not required to upload a Power Point presentation. You are only required to upload your video pitch.
Should you have any questions, please contact abstracts+wtc2025@invajo.com.
Information to record presentation via Zoom
- First, make sure you have Zoom installed. If this is not installed, you can do so via the link: https://zoom.us/download.
- Start Zoom and log in via your Gmail account, Facebook, or create a new account. You can create a new Zoom account for free at: https://zoom.us/freesignup/
- Once you have logged in, the box below will ask if you want to open this application. Click on “open zoom.us”

4. Now Zoom will start and you will see the image below. Click on “New Meeting”

5. Zoom will ask if you want to use the computer’s speaker and microphone, click on “join with computer audio” (see picture below).

6. Now the image below will appear. Click on “share screen” and select your PowerPoint or similar.

Make sure you have access to:
- An MS PowerPoint Presentation or the document you will present
- A computer
- An audiovisual recording device (camera, microphone and speakers)
- Internet
7. Click the box for your presentation and then share the screen (share). Also note that you must have started your PowerPoint to be able to find it in this list.

8. Now the image is shared and you can start recording. If you click on “more” at the top of the image and then “Record”, your voice and the slideshow will start recording (See black arrow in the image below). You can click the same button and to stop the recording. If you would like to add a video recording of yourself presenting, you can click on “start video” (see red arrow in the picture below).

9. Note that the file with your recording will be automatically saved within “documents” on your computer. If you go to “documents” and look up a folder called “Zoom” you will find the file with the recording. If the file is not converted to a .mp4 file automatically after you finish recording and the meeting, you can double-click it and the file will change to a .mp4 file.

7.1. If Zoom says you need to allow it to access your files, click on the image below (only for Macs that have not previously approved this):

Information to record presentation via Microsoft Teams
(1) In Microsoft Teams, go to Calendar tab and click the button “Meet now” to start a meeting without invite any participant.
(2) You will now see an option to join now. Before you join, select devices to check that your preferred device settings are selected for audio and video input. Also check the audio icon indicates audio is on (a line through the icon means it is off).
Make sure you have access to:
- An MS PowerPoint Presentation or the document you will present
- A computer
- An audiovisual recording device (camera, microphone and speakers)
- Internet
- A Microsoft account
(3) Make sure to unmute yourself and you can start your presentation, you can upload your presentation files by clicking the Share button “
(3) Once ready to record your presentation, click on the three dots “More actions” from the meeting control bar and click “Start recording”. See below picture:

(4) When finished with the presentation, click “More actions” and then click “Stop recording“.
It might take some time to process the recording, when it’s completed, the recording will appear in the meeting chat for that Team’s channel. The option to download content will appear as displayed in the screenshot below.

For your reference: